Nerdminer Setup Guide
Welcome, now you are one of us!
This how-to guide will walk you through the process of setting up your Nerdminer solo miner, from unboxing to getting it connected to your Wi-Fi and entering your bitcoin address for receiving mining rewards. Let's get started!
Choose the right Nerdminer before setup
If you are still deciding which device to configure, start with the model that matches your setup goal:
- Nerdminer V2 Pro: compact entry-level solo miner for a simple first setup.
- Nerdminer Quattro: stronger desk setup with more mining power and the same beginner-friendly WiFi flow.
- All Nerdminer devices: compare available models shipped from Europe.
Quick tip: keep your WiFi password and Bitcoin address ready before you power on the miner. That avoids restarting the setup flow at the NerdMinerAP step.
Nerdminer setup FAQ
What is the NerdMinerAP WiFi network?
NerdMinerAP is the temporary setup hotspot created by the device. Connect your phone or computer to it, open 192.168.4.1 if the setup page does not open automatically, then enter your home WiFi and mining settings.
Which pool address should I use?
Use the pool address recommended by your preferred solo mining pool. Copy it exactly, including port number if one is provided. A wrong pool address is one of the most common reasons a Nerdminer appears connected but does not start mining correctly.
Can I change the Bitcoin address later?
Yes. Reopen the miner configuration interface, update the payout Bitcoin address and save the settings. Always double-check the address before saving.
Does a Nerdminer need a full node?
No. A Nerdminer can mine through a solo mining pool without your own node. If you want to strengthen your Bitcoin setup further, pair it with a Liquidbox V5 Bitcoin Full Node.
What you need
- Your NerdMiner: Nerdminer V2 Pro, Nerdminer Quattro
- USB-C Cable: Required to power and set up your NerdMiner.
- Wi-Fi Connection: A stable Wi-Fi network to connect your NerdMiner to the internet.
- Computer or Mobile Phone: To configure the NerdMiner.
PRO TIP
Ensure you have your BTC wallet address copied before you start the setup process. If not, you will be stuck at step 4 and need to restart.
How-To set up your Nerdminer
1. Power up you Nerdminer
Connect the USB-C cable: Connect one end of the USB-C cable into your Nerdminer and the other end into a power source (such as as USB port on you computer or a USB wall adapter).

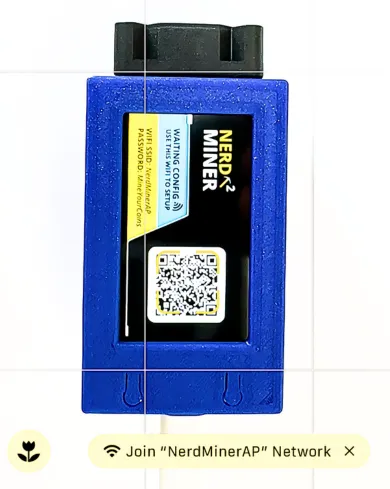
2. Connect to the Nerdminer Wi-Fi network
QR Code scan: If your mobile phone supports QR cod scanning, you can scan the QR code displayed on the Nerdminer's screen to connect directly to its Wi-Fi network. Jump directly to step 4.
Alternative: Open the Wi-Fi settings on your computer or mobile phone.a.
a. Find network: Look for a Wi-Fi network named `NerdMinerAP`.
b. Connect to network: Select `NerdMinerAP` and enter the password `MineYourCoins` to connect. Proceed with Step 3.
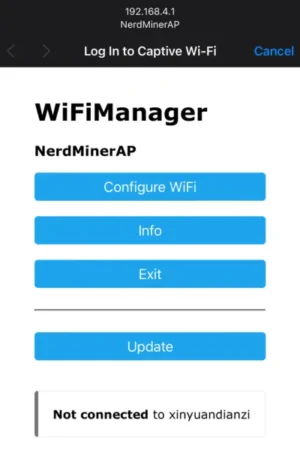
3. Access the Configuration Page
Automatic Redirection: You should be automatically redirected to the setup page.
Manual Navigation: If not automatically redirected, enter `192.168.4.1` in the browser's address bar.
4. Configure Wi-Fi and Bitcoin address
Configuration Screen: You should now see the setup screen.
Click "Configure Wi-Fi": This will open the Wi-Fi configuration settings.
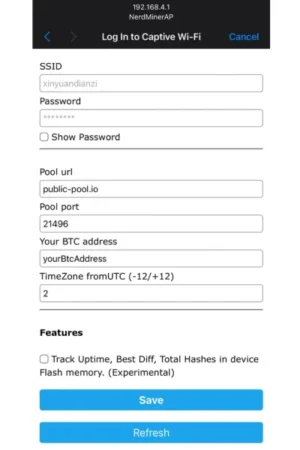
Enter Wi-Fi Details:
- Select Your Wi-Fi Network: Choose your home or office Wi-Fi network from the list.
- Enter Wi-Fi Password: Type in the password for your selected Wi-Fi network.
Enter Bitcoin Address: Provide the Bitcoin address where you want to receive block rewards. We suggest using a SegWit address starting with 'bc1q'
Pool Settings: The default pool settings are preset to `public-pool.io`. You can customize these if desired but sticking with the default is usually advisable.
PRO TIP
Set up your own personal mining pool using Liquid Box V3 Bitcoin node. It lets you use your own equipment and software, keeping your privacy intact. Plus, you'll contribute to the network's strength and safety without needing 3rd party mining pools.
5. Save and Restart
Click "Save": Once you've entered all the necessary information, click the "Save" button.
Device restarts: Wait for a moment, then restart your NerdMiner to apply the new settings.
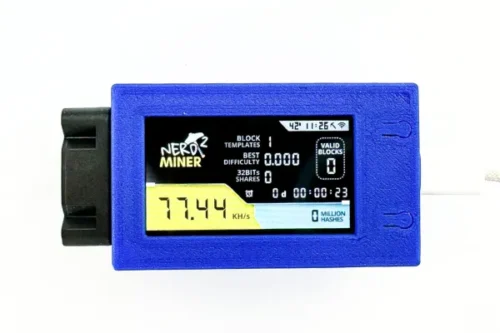
6. Verify and Monitor
Main Screen: After restart, your NerdMiner should display its main screen.
Check Performance: You should see the mining performance metrics, including the hash rate. Expect around 78 KH/s, though this may vary slightly depending on the firmware version.
Success! You’ve completed our detailed NerdMiner Setup Guide. We hope you found it helpful. 🚀
Final Notes
Block rewards: In the rare event that your Nerdminer discovers a valid block, you will receive the full block reward at the bitcoin address you specified, minus a small fee directed towards the solo mining pool.
Support: Should you encounter any issues during setup, shoot us a message via our telegram or write an email, we are happy to help.
Congratulations! Your Nerdminer Bitcoin miner is now set up and ready to mine. Enjoy your journey into the exciting world of Bitcoin mining!
Happy hashing!
Nerdminer setup FAQ
What is the NerdMinerAP WiFi network?
NerdMinerAP is the temporary setup hotspot created by the device. Connect your phone or computer to it, open 192.168.4.1 if the setup page does not open automatically, then enter your home WiFi and mining settings.
Which pool address should I use?
Use the pool address recommended by your preferred solo mining pool. Copy it exactly, including port number if one is provided. A wrong pool address is one of the most common reasons a Nerdminer appears connected but does not start mining correctly.
Can I change the Bitcoin address later?
Yes. Reopen the miner configuration interface, update the payout Bitcoin address and save the settings. Always double-check the address before saving.
Does a Nerdminer need a full node?
No. A Nerdminer can mine through a solo mining pool without your own node. If you want to strengthen your Bitcoin setup further, pair it with a Liquidbox V5 Bitcoin Full Node.
{
"@context": "https://schema.org",
"@type": "HowTo",
"name": "How to set up a Nerdminer",
"description": "Connect a Nerdminer to WiFi, open NerdMinerAP, enter pool settings and start Bitcoin solo mining.",
"supply": [
{"@type": "HowToSupply", "name": "Nerdminer device"},
{"@type": "HowToSupply", "name": "USB-C power supply"},
{"@type": "HowToSupply", "name": "WiFi connection"},
{"@type": "HowToSupply", "name": "Bitcoin address"}
],
"step": [
{"@type": "HowToStep", "name": "Power up the Nerdminer", "text": "Connect the Nerdminer to power with a USB-C cable."},
{"@type": "HowToStep", "name": "Connect to NerdMinerAP", "text": "Use a phone or computer to connect to the temporary NerdMinerAP WiFi network."},
{"@type": "HowToStep", "name": "Open the setup page", "text": "Open 192.168.4.1 if the configuration page does not appear automatically."},
{"@type": "HowToStep", "name": "Enter WiFi, pool and Bitcoin address", "text": "Save your home WiFi, pool address and payout Bitcoin address in the setup form."},
{"@type": "HowToStep", "name": "Restart and verify mining", "text": "Restart the miner and check the main screen for hashrate and connection status."}
]
}